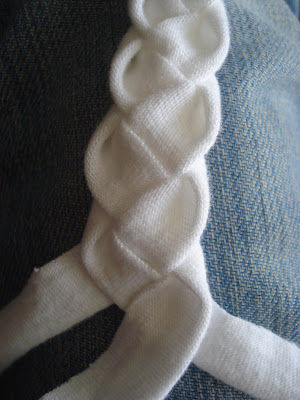
 A couple of weeks ago I saw a headband at Target that was braided with about five strips of knit fabric. I was all like, “That’s would be so easy to make.” And it was. (Confession: I don’t know how to braid with more than three pieces, so I just did a normal 3-braid. Promise: if you know how to do that fancy extra-braided stuff, it will be just as easy to make.) Now my sixth-grader and kindergartener have some cute new hair accessories for school.
Here's what you need:
tape measure
old t-shirt
ruler
rotary cutter and mat (easier!) OR scissors and disappearing marker
sewing machine OR needle and thread
The full instructions are just a click away...
STEP 1:
Fold you t-shirt in half (down the front vertically) and lay it out on your cutting mat. Use your ruler and rotary cutter to trim off the hemmed part, then slice three 1-inch strips.
[If you're using scissors, fold t-shirt and use a long ruler to draw straight lines with disappearing marker then cut.]
Your three long strips will actually be loops at this point--snip them somewhere so they're just strips.
STEP 2:
Braiding time. I clipped the end of my strips together with one of these bad boys:
and hooked it to the hem of my crops and I was in business. Go ahead and braid all the way to the end. Important: take care not to stretch the fabric as you braid it, you want it to be stretchy later.
 |
| You can use whatever you want to secure the braid, I just happen to have the binder clip within reach. |
..and employed a little twist with each pass to keep the raw edges away from the outer sides of the braid.
 |
| The knit fabric won't fray, I just thought the folded edges looked nicer than the cut ones. |
STEP 3:
Interrupt your 11-year-old's pancake-making (thank her later for making lunch) so you can measure her head.
Mark your nice long braid at the length you want the finished headband.
STEP 4:
Cut your braid off a couple of inches past your mark. Doesn't have to be exact, you'll trim it later.
Lose the binder clip and loop your braid around to make a circle (careful not to twist it). Line up your mark an inch or two from the other end of the braid. On both ends, flatten out and stack up the three strips.
 |
| The end that used to be binder-clipped on bottom, the end you just marked and cut laying (lying?) on top. |
Trim close to stitches (knit doesn't fray--hooray).
STEP 5:
Admire.
 |
| Leftover braid can be made into a bracelet! Cool! |
This headband was so quick and easy, I turned right around and made another one for my 4-year-old. This time I cut 1/2 inch strips and her head was small enough that my braid could wrap around it twice. So we went with that. I wasn't as meticulous with keeping the raw edges inside this time to see how that would look over all. It think it turned out just as cute.


1 comment:
Holy smokes. I'm totally doing this. Awesome tutorial!!
Post a Comment